Start here
CustomTone 2 — a generative instrument
CustomTone 2 is a software instrument that doesn't just make sound — it composes with you. Feed it a key and a chord progression, and its engines generate evolving melodies, rhythms, and textures in real time. Hold a chord and listen, or play along; the instrument fills in the motion.
New to plugins? The 30-second version
CustomTone 2 is a VST3 / AU plugin (plus a Standalone app). A plugin loads inside your music software (your "DAW" — Ableton Live, Logic, FL Studio, Studio One, etc.) on an instrument track. You send it MIDI notes from your keyboard or a clip, and it produces audio. Prefer not to open a DAW? Launch the Standalone app and play it directly.
How the four pages fit together (the signal flow)
Think of it as an assembly line, left to right across the top tabs:
- Harmony decides what notes are in play — key, scale, chords, mood.
- Motion decides when and how things happen — a node map that sequences notes and drives modulation.
- Texture decides what it sounds like — up to six layers of samples, oscillators, and wavetables.
- Finish polishes the output — saturation, filter, delay, reverb, and a safety limiter.
Five Macros sweep many parameters at once for fast, musical moves, and the Evolve button mutates the whole patch to surface ideas you wouldn't have dialed in by hand.
Always visible
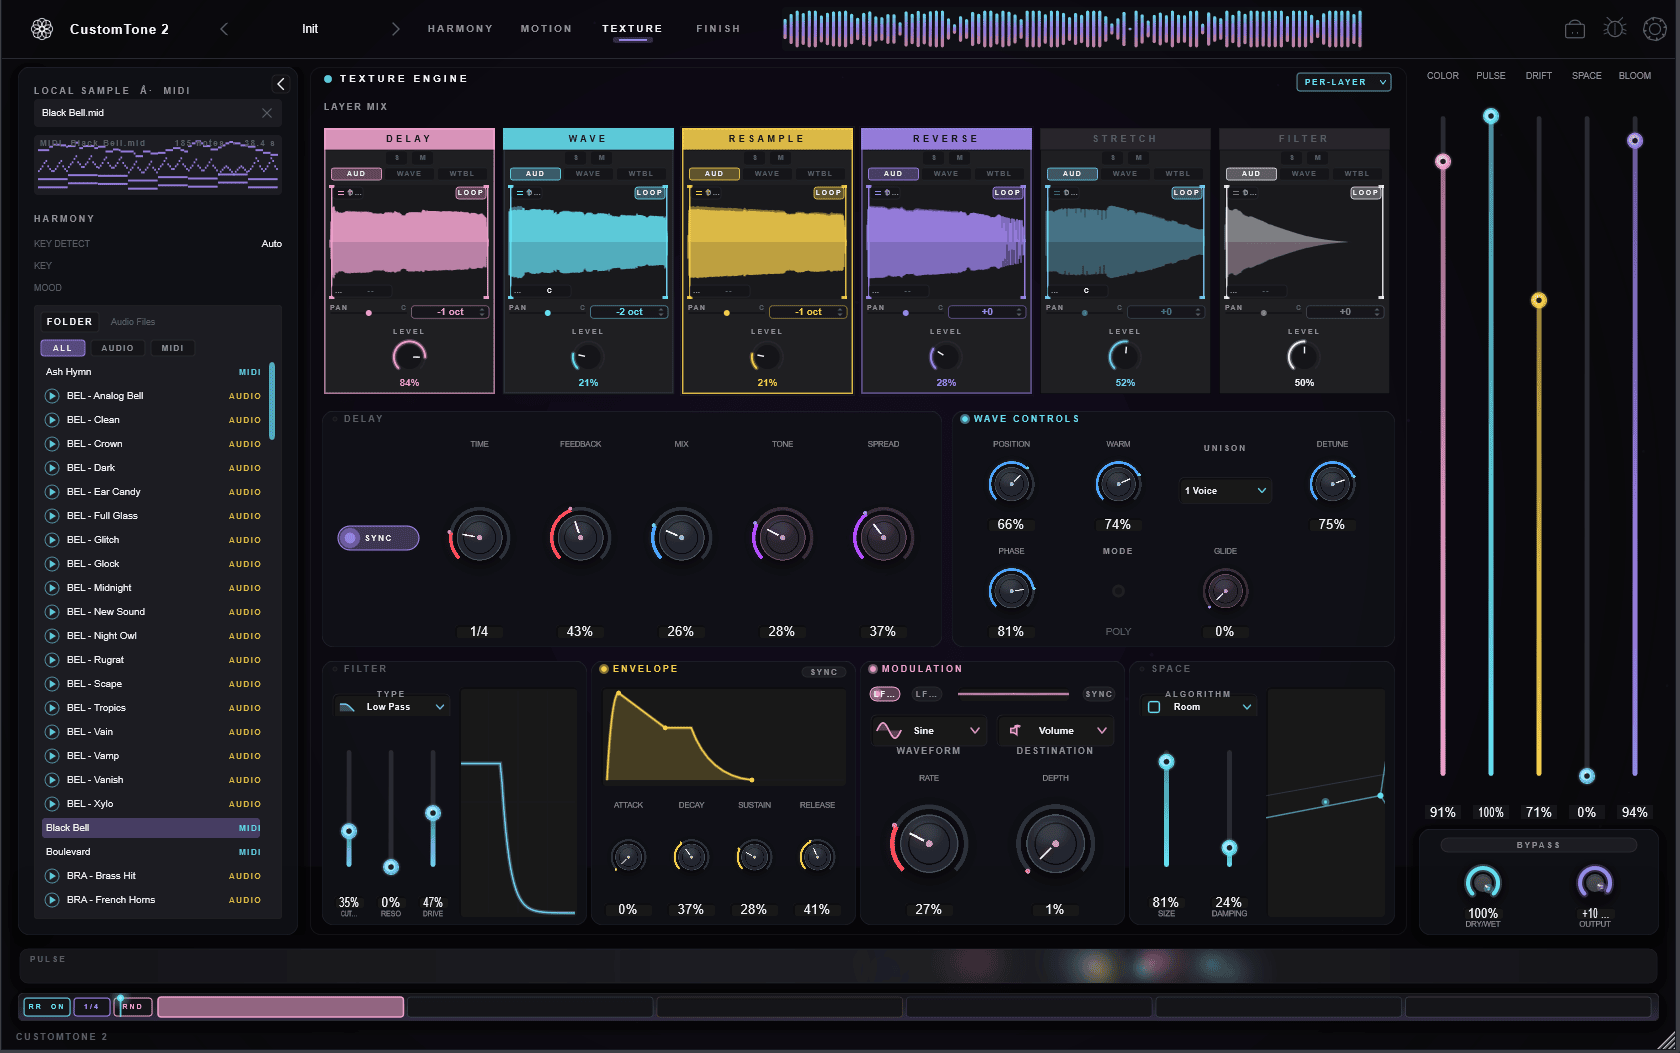
The Top Bar
The strip across the top is your home base — presets, the four page tabs, the output meter, and utilities.

Preset name click
Shows the loaded preset (e.g. "Velvet Loop"). Click it to open the preset browser to load, save, and set your default "Init" patch. The arrows step to the previous / next preset.
Page tabs Harmony · Motion · Texture · Finish
Switch between the four main pages. The plugin opens on Texture by default.
Tempo Standalone only
The Standalone app shows a tempo control (BPM + time signature) that sets its internal clock. In a plugin (VST3 / AU) there's no tempo control in the top bar — CustomTone follows your DAW's project tempo from the host automatically.
Output meter
A live level meter of the plugin's output, so you can see how hot the signal is at a glance.
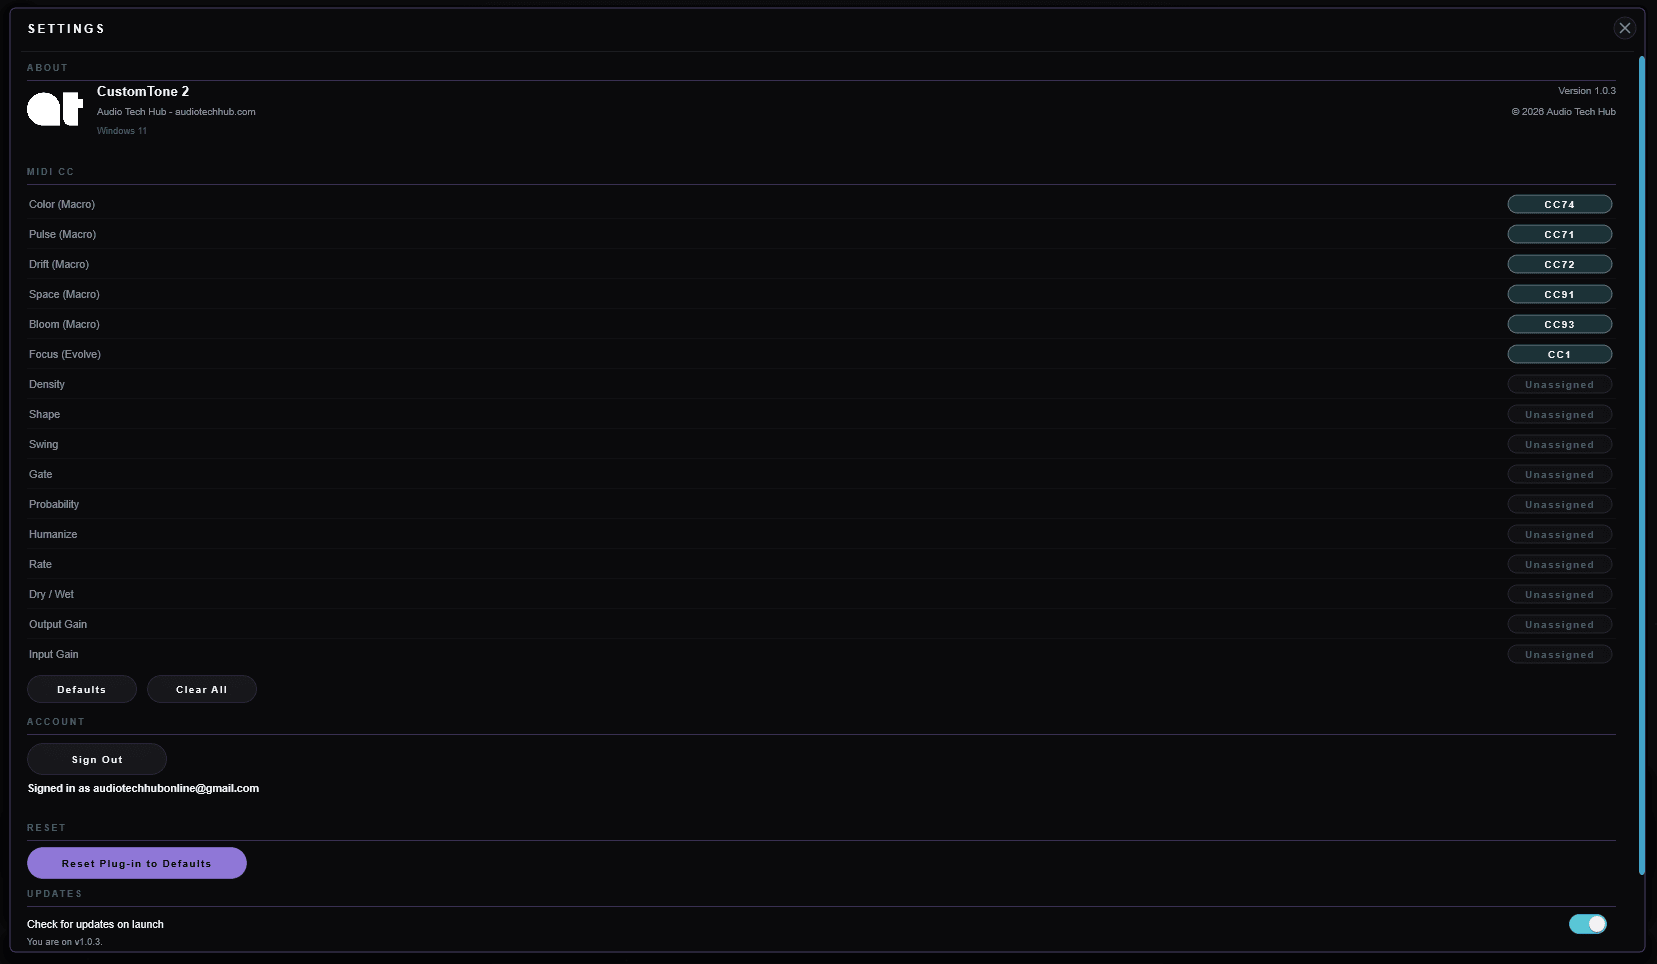
Settings (gear)
MIDI CC bindings, update checks, and reset. A small amber dot on the gear means a new version is available.
Report a bug · Store
The beetle opens a pre-filled support email (with your version + OS). The bag opens the in-plugin preset Store.
What notes play
Harmony
Set the musical foundation: the key and scale, the chord progression, and the "mood" that colors the engine's choices. Everything the instrument plays stays inside what you define here.
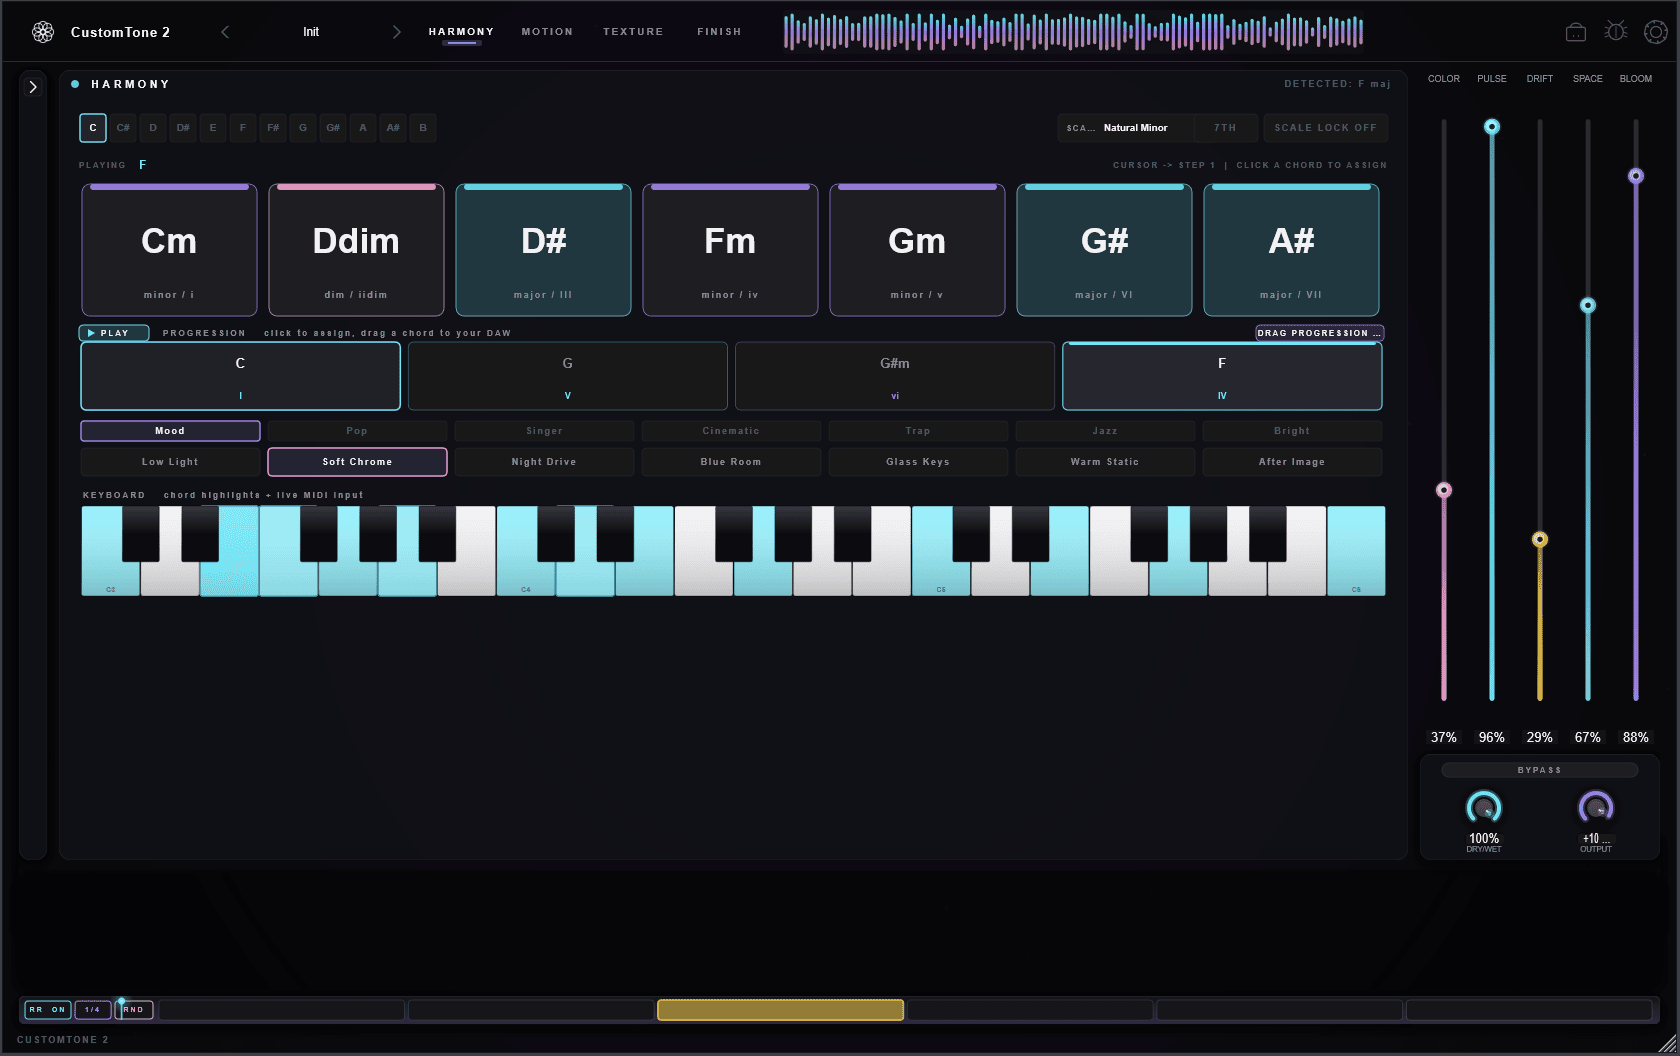
Key
Twelve pitch-class chips (C through B). The tonic — it sets which chords are diatonic (in-key) in the palette below.
Scale
Major, Natural / Harmonic / Melodic Minor, the modes (Dorian, Phrygian, Lydian, Mixolydian, Locrian), Major / Minor Pentatonic, and Blues. Drives the in-key palette and note-snapping.
7th
Extends the palette with seventh chords (maj7, m7, 7, m7♭5) — jazzier, more colorful voicings.
Scale Lock
Snaps every incoming note — your playing, motion-fired chords, dropped MIDI — to the nearest note in the current key + scale. Auto-engages when a clearly-keyed MIDI file is dropped in.
Chord palette
Seven cards for the diatonic chords (I–VII) of your key/scale. Click one to audition it. Card labels show the Roman numeral and the actual chord.
Progression (8 steps)
An eight-step chord pattern shown as a strip, with a live playhead. Click a step to edit its degree/quality; this is the harmonic loop Motion plays through.
Moods
Seven one-click profiles (Low Light, Soft Chrome, Night Drive, Blue Room, Glass Keys, Warm Static, After Image) that weight the engine toward certain chord colors and motion.
Progression library
Ready-made progressions sorted by category — Pop, Singer-Songwriter, Cinematic, Trap, Jazz, Bright. One click drops a full pattern into the eight steps.
Detected key
When you drop in audio or MIDI, CustomTone analyzes it and shows the detected key here. If it isn't confident, it says so rather than guessing.
When & how things happen
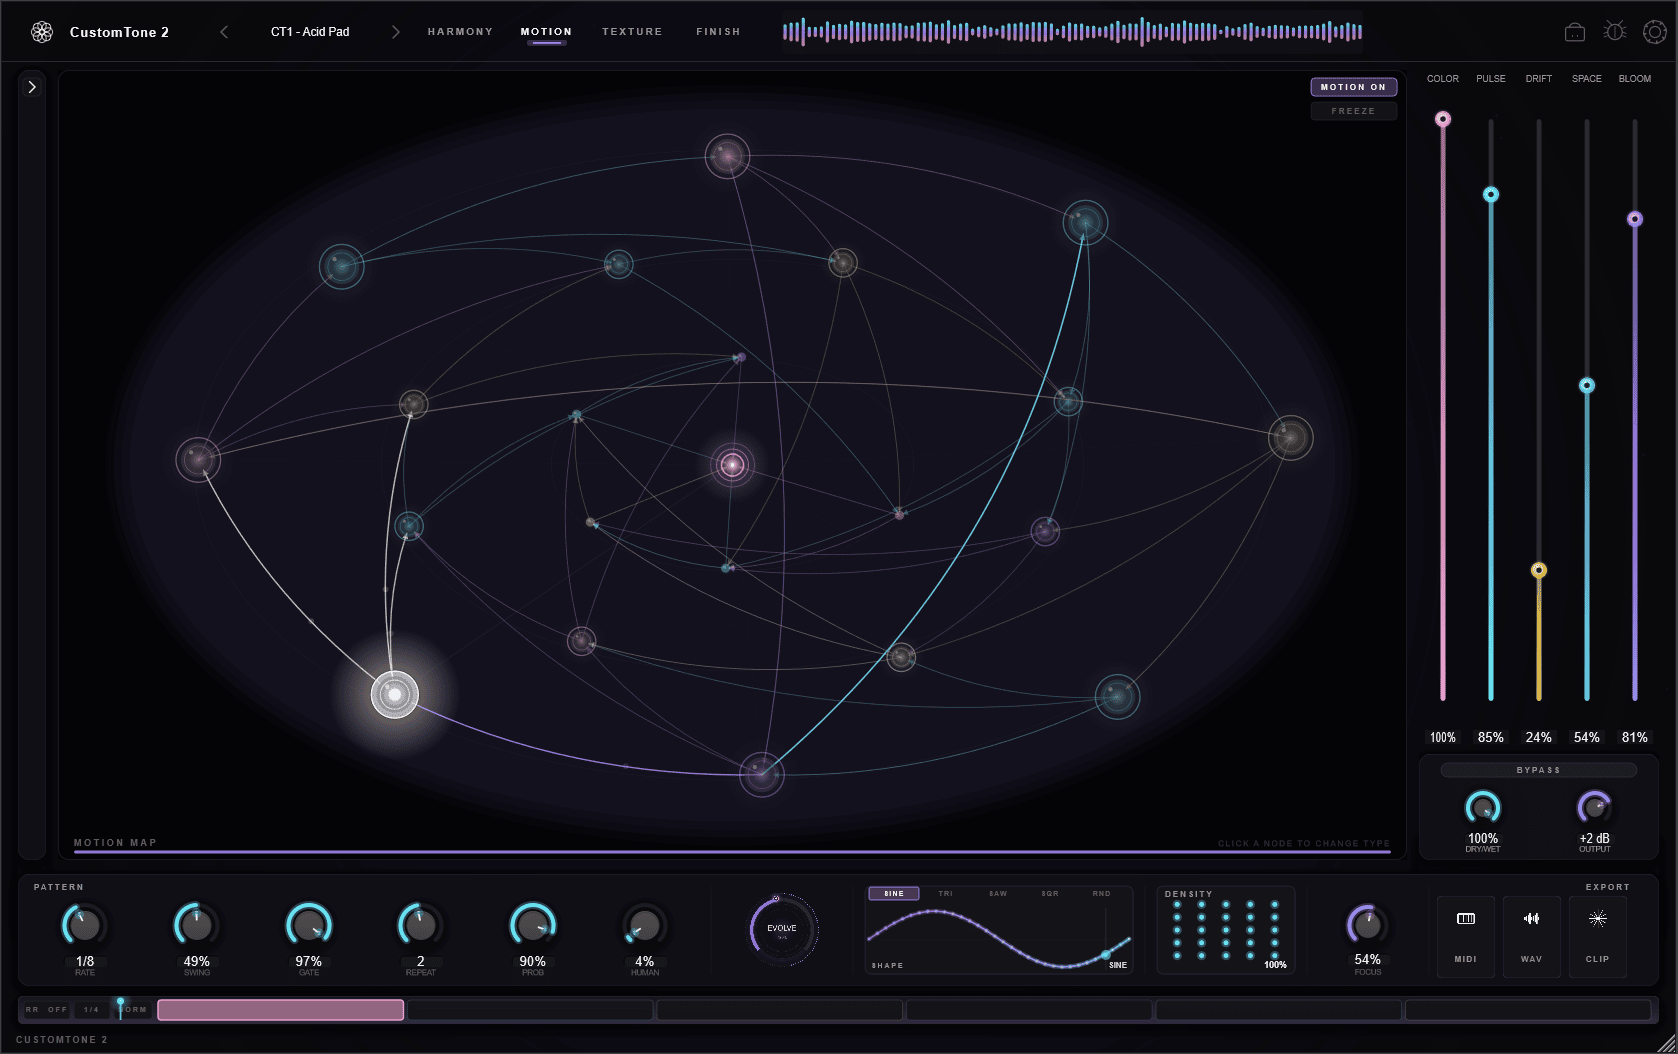
Motion
Motion is the brain that turns your harmony into a performance. It's a node map: a hub in the center wired to outer nodes, each of which triggers a musical event. A "playhead" travels the connections, firing nodes as it goes.
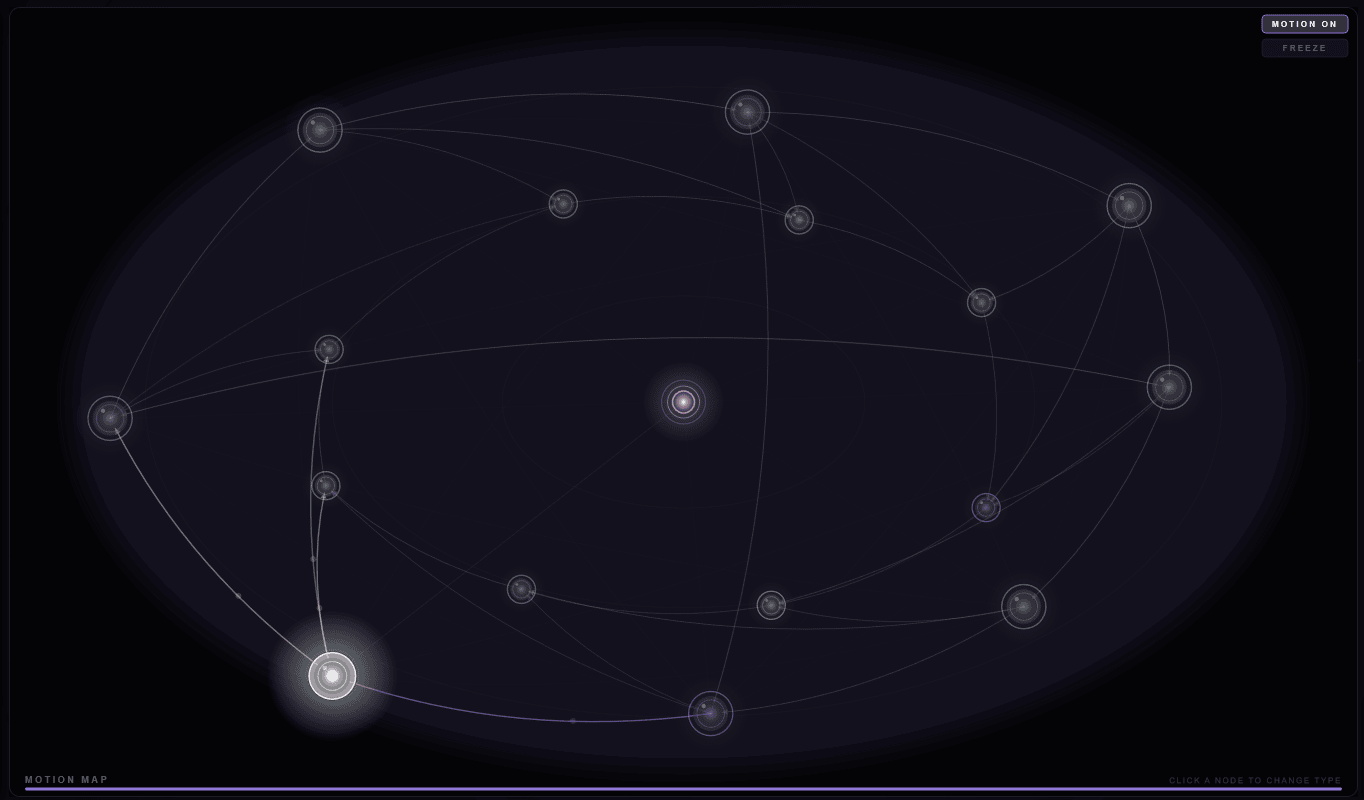
Motion On / Freeze
The master switch for the sequencer. Freeze pauses the playhead where it is without turning motion off — useful for holding a moment.
Nodes & node types
Each node does one job: Chord, Arp, Gate, Grain, Pitch, Filter, Delay, Reverb, Reverse, Width, Saturation, Mute. Right-click (or long-press) a node to change its type.
Primary node
Click a node to make it the starting point of the walk. The highlighted node is where the sequence begins.
Rewiring (edges)
Drag from one node to another to reroute the flow. Your hand-placed connections are "sticky" — Evolve won't prune them.
Rate
How often the sequencer steps — 1/16, 1/8, 1/4, 1/2, 1/1 — locked to your tempo.
Swing & Humanize
Swing pushes off-beats for a triplet feel; Humanize adds subtle, natural timing/velocity variation so it doesn't sound robotic.
Gate & Repeat
Gate sets how long each step sounds (staccato to legato); Repeat retriggers a step up to four times for rolls and stutters.
Probability & Density
Probability is the chance a step fires; Density (the 5×5 dot grid) sets how many notes land per pass — sparse and considered, or full and busy.
What it sounds like
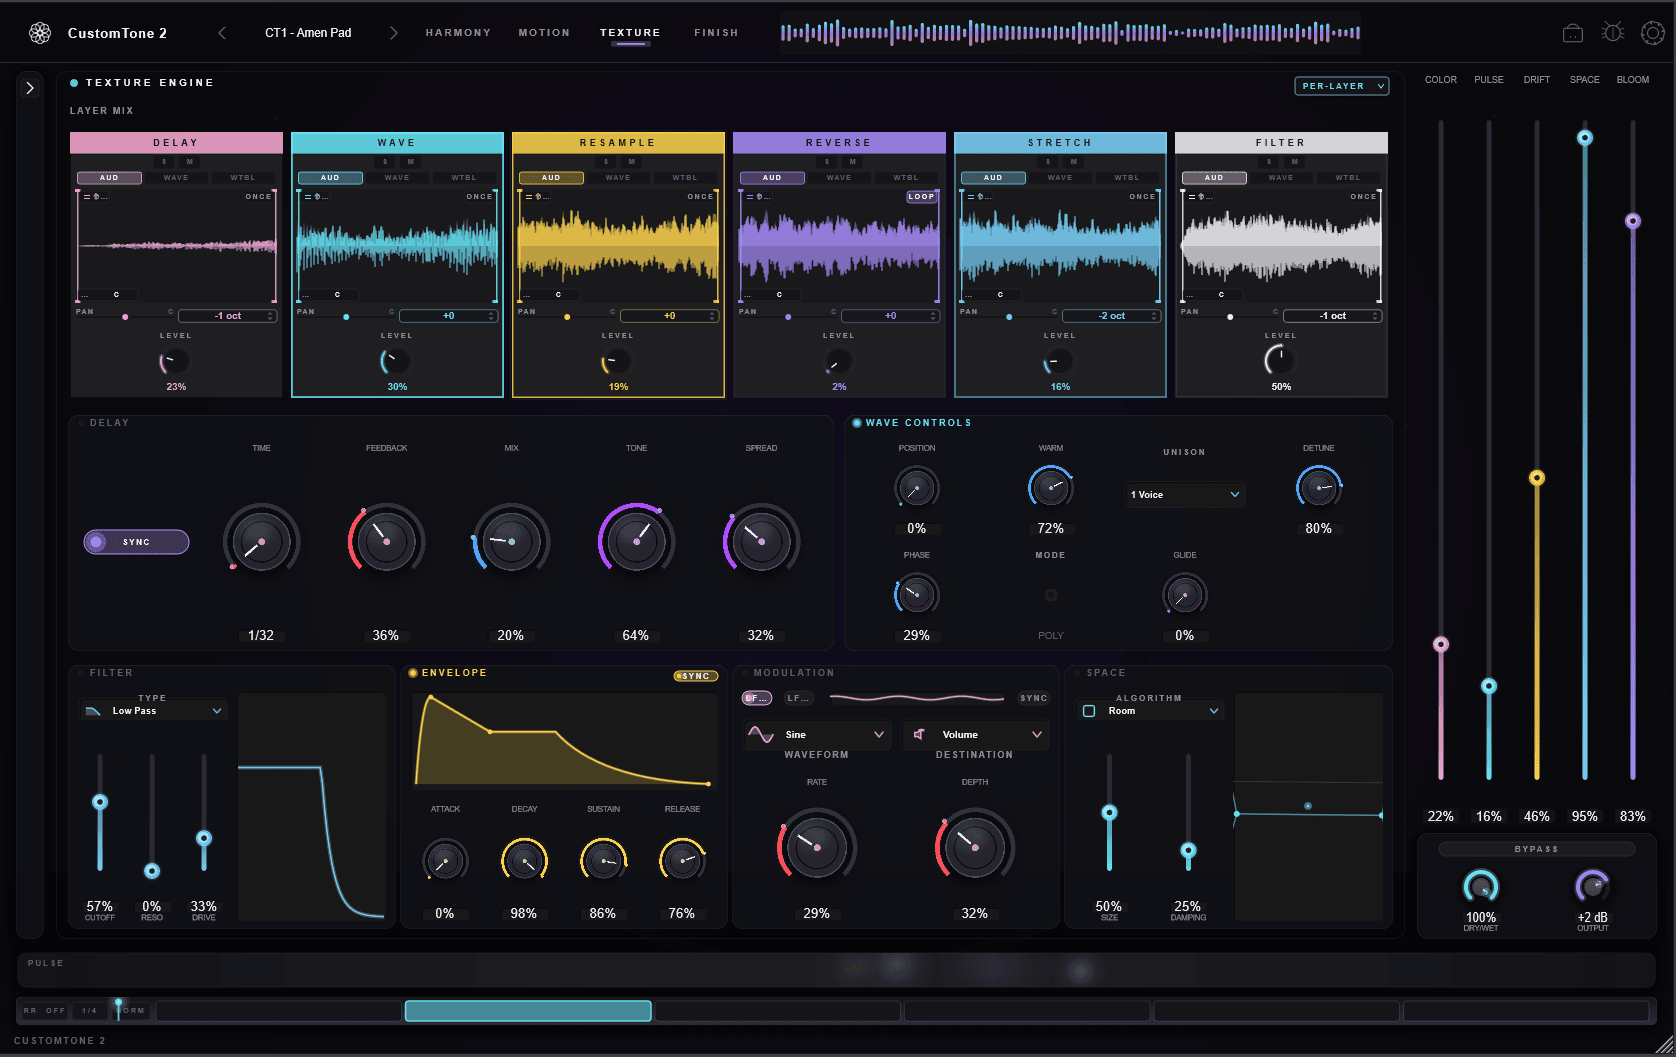
Texture & Layers
Texture is the sound-design engine: six independent layers, each its own little instrument. Stack them for a rich, evolving timbre, or let them trade off so a new layer answers each note.
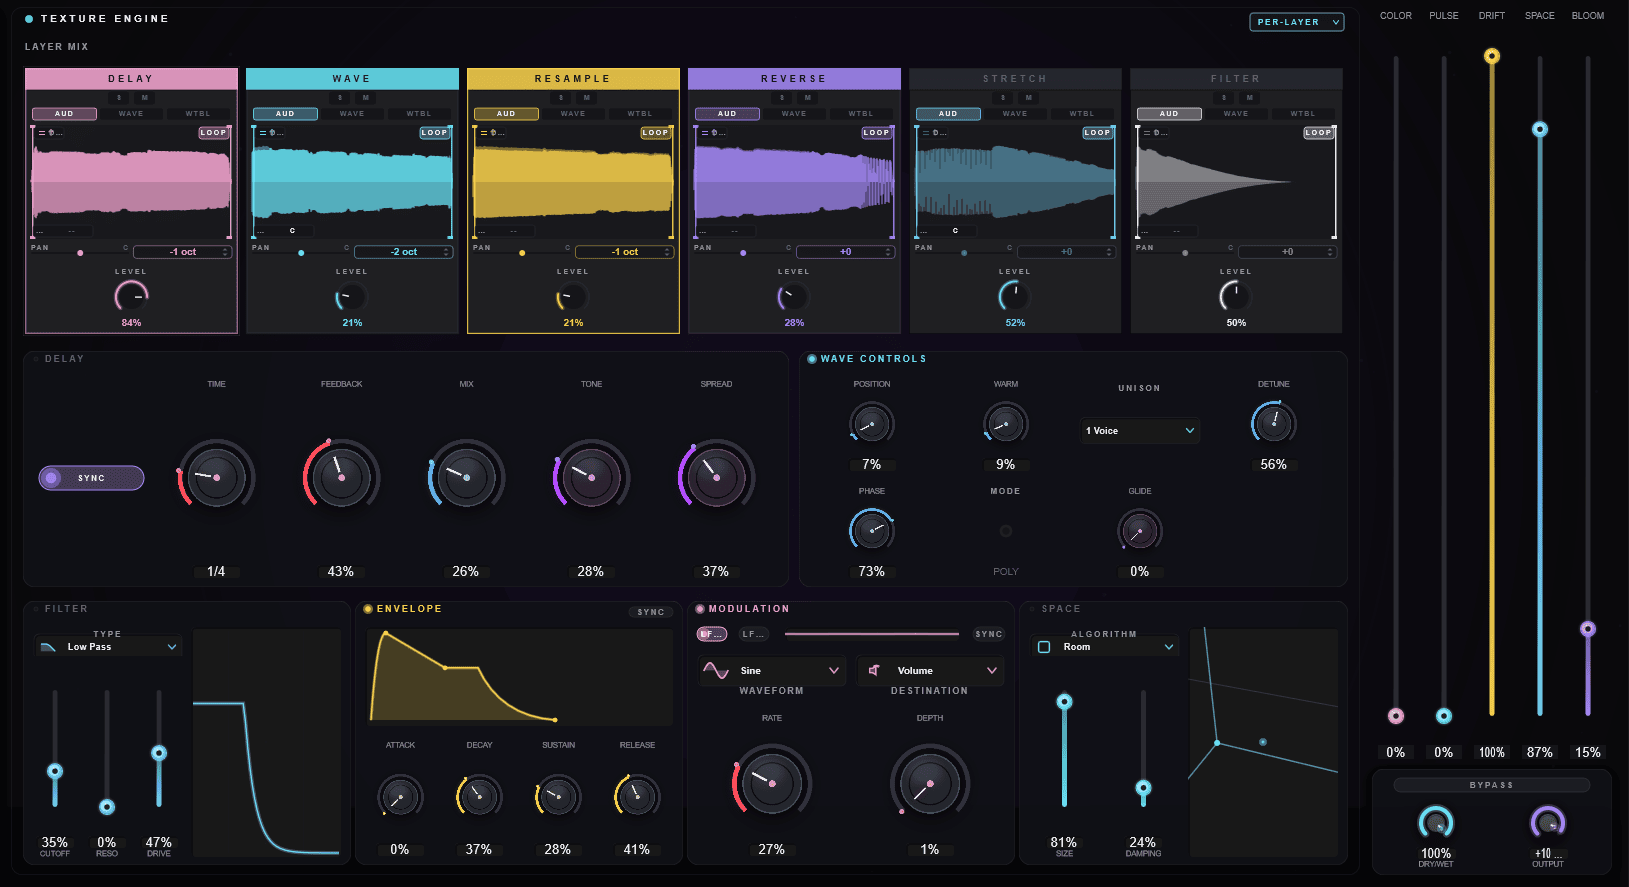
Each layer's source
Every layer can run one of three sound engines:
Audio sample
Plays a sample or loop — a bundled wave, or your own file dropped in. The waveform shows the audio with draggable loop handles to choose the slice that plays.
Wave oscillator
A built-in synth oscillator (sine, square, saw, triangle) — clean, tunable tones generated on the fly, no sample needed.
Wavetable
A morphable wavetable: sweep through a table of waveforms for evolving, animated timbres.
Per-layer controls
Power
Turns the layer on or off entirely. An off layer makes no sound and is skipped by round-robin.
Solo (S) / Mute (M)
Solo auditions one layer alone; Mute silences a layer while keeping its content loaded and ready.
Level
This layer's send into the mix — use it to balance the six layers against each other.
Pan & Pitch
Place the layer in the stereo field, and transpose it ±24 semitones (great for octave doublings and detuned stacks).
Shared texture controls
Round-Robin
On: each new note advances to the next powered layer, so layers take turns. Off: every powered layer plays together. Mode picks order (Normal) or Random; Rate sets how fast it advances.
Density grid
The 5×5 dot grid sets note-count per cycle for the texture engine — drag to taste, from sparse to dense.
LFO shape
A drawable modulation curve with five presets (Sine, Triangle, Saw, Square, Random) — or draw your own 32-point shape to sculpt how each step's level moves.
One knob, many moves
The Five Macros
Macros are big, musical controls that sweep many parameters at once — the fastest way to reshape a patch, and easy to automate in your DAW. Each one also drives the matching Finish effect.
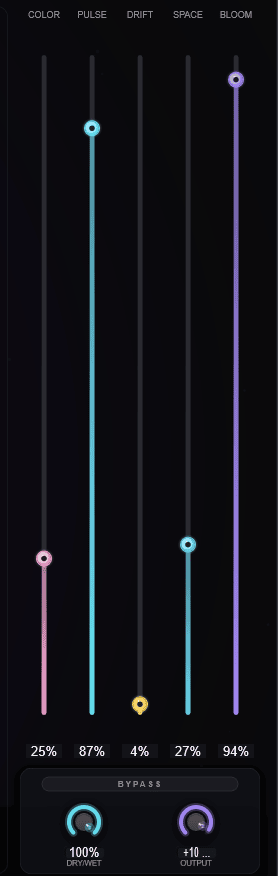
Color
Brightness and tone — opens or darkens the finish filter and shifts the layers' pitch spread. Turn up for air and shimmer.
Pulse
Rhythmic energy — drives the delay time and feedback for echoes and momentum.
Drift
Movement and instability — nudges layer pitch and modulation depth for a living, slightly detuned feel.
Space
Depth — reverb size and stereo width. Low for intimate and dry, high for vast and washed-out.
Bloom
Weight and warmth — saturation/drive that adds harmonic body, from gentle glue to rich grit.
Polish the output
Finish (FX)
The output stage — four classic effects in series, each with its own on/off LED, followed by a safety limiter so things never clip ugly.
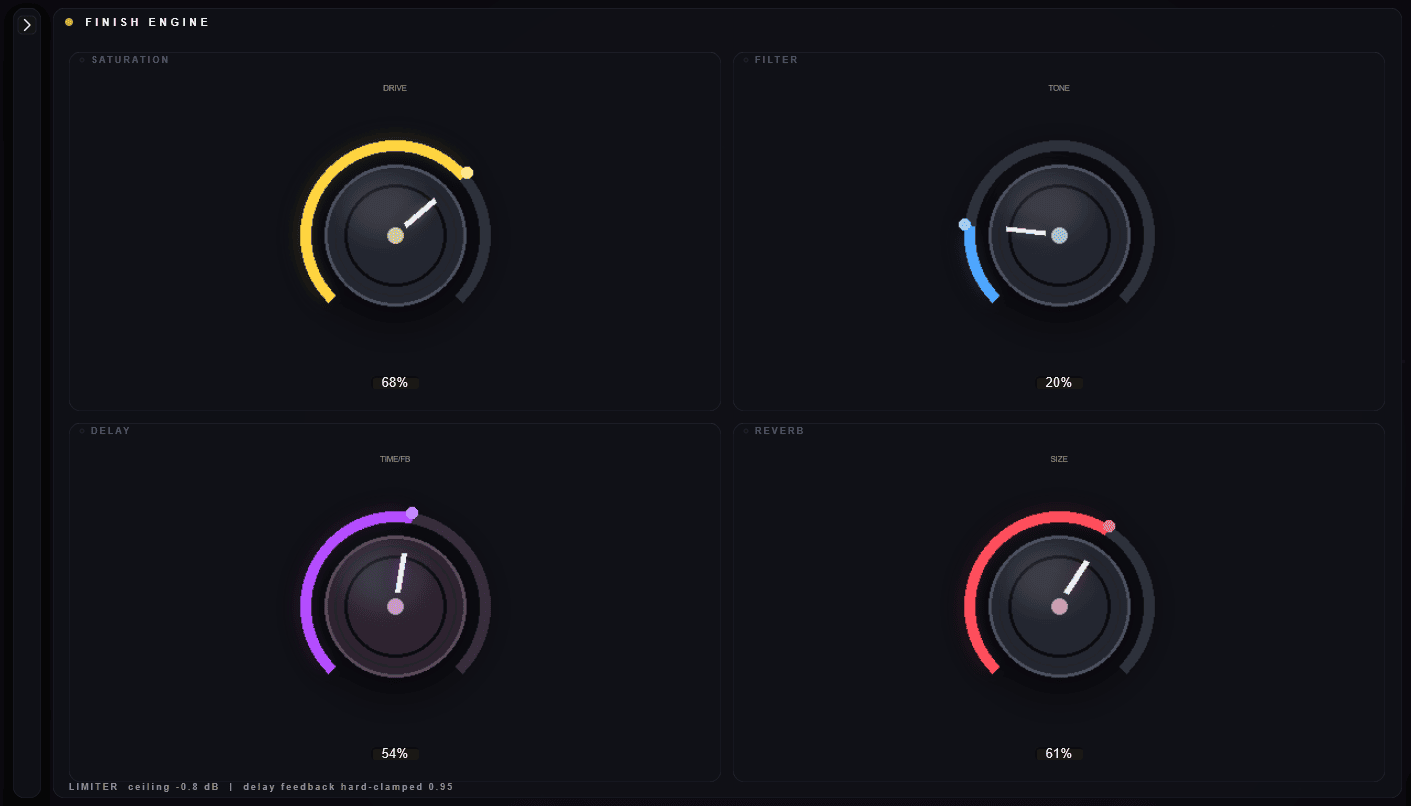
Saturation — Drive
Adds harmonic body and warmth at low settings, pushing into rich grit as you turn it up. (Driven by the Bloom macro.)
Filter — Tone
A finish-stage filter: lower is darker and scooped, higher is open and shimmering. (Driven by Color.)
Delay — Time / Feedback
Tempo-synced echo time and feedback. Higher feedback means longer trails — safely capped so it can't run away. (Driven by Pulse.)
Reverb — Size
Room dimension and decay; larger gives a longer, more diffuse tail. (Driven by Space.)
Power LEDs
Each effect's header LED toggles it in or out of the chain, so you can A/B instantly.
Limiter
Always-on brick-wall safety at −0.8 dB on the output, so the plugin stays clean no matter how hard you push it.
Levels & your own audio
Mixer, Output & Source
Global level controls, and the panel for bringing your own samples or MIDI into the instrument.
Dry / Wet
Blends the unprocessed instrument against the full motion + texture + finish chain. 0% is dry only; 100% is fully effected.
Output
Master level before the limiter (−24 dB to +12 dB) — set it to match your DAW's nominal level.
Source — drop audio
Drag in WAV/AIFF/MP3/FLAC/OGG. CustomTone shows the waveform, runs key + mood detection, and lets you slice it into the texture layers.
Source — drop MIDI
Drop a MIDI file to drive the harmony/motion from your own part; Scale Lock can snap it into key automatically.
Detected key / mood
After analysis, the panel shows the detected key and mood as hints — handy for matching the instrument to existing material.
Collapse
Fold the Source panel down to a thin rail when you want more room for the main pages.
Find new ideas
Evolve
Evolve mutates the patch — rerolling chords, motion, texture, and effects to surface variations you wouldn't have programmed by hand. It keeps what you've locked, so it explores without destroying your work.
Evolve (click)
One click mutates the current patch by the focus amount. Keep clicking to keep exploring.
Focus (drag)
How adventurous the mutation is — high focus makes subtle tweaks; low focus does wild rerolls (and adds random map connections).
Locks
Protect any section from change: Key, Scale, Chords, Rhythm, Texture, FX, and the Motion Map. Lock what you love, evolve the rest.
Undo history
Every evolve is snapshotted (up to 16 deep), so you can always step back to a version you preferred.
Sounds in the box
Presets & Sounds
CustomTone 2 ships full of starting points, and the original CustomTone library comes built in — rebuilt to run on the new engine.
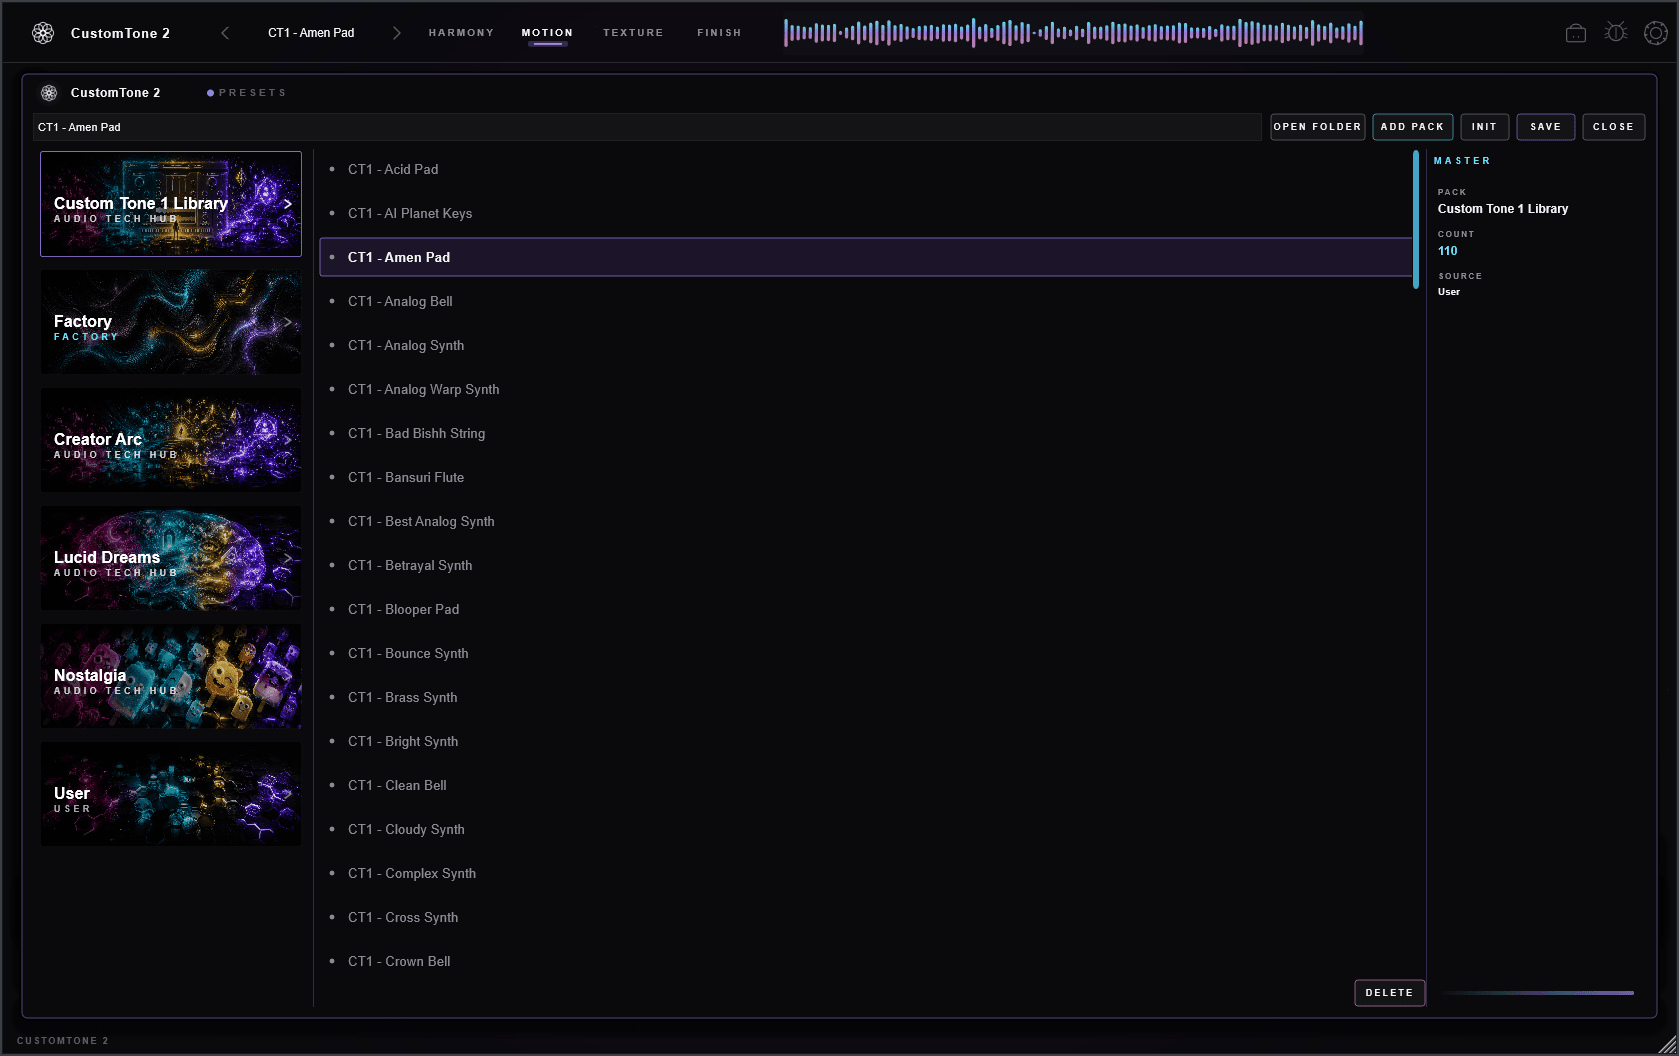
Custom Tone 1 Library
The full sound set from the original CustomTone — 110 presets, rebuilt as single-layer patches running on CustomTone 2's new DSP. Pinned to the top of the browser so it's always one click away.
Factory presets
A curated bank of starting points that show off what the engine can do — load one and start evolving.
The Wave content
Beyond presets, each layer's Wave (oscillator) and Wavetable engines generate tone procedurally, and the Audio engine plays the bundled waves or your own samples.
Saving your own
Click the preset name → Save to store your patch. Set any preset as your default "Init" so new instances start where you like.
Expansion packs & Store
Optional packs (Creator Arc, Lucid Dreams, Nostalgia) add more presets, samples, and MIDI seeds. Browse and buy from the in-plugin Store (the bag icon).
Get it out
Export
Capture what the instrument generates — as MIDI to keep editing, or as audio to drop straight into a track.
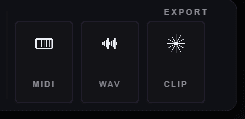
MIDI export
Capture the notes Motion generates to a standard MIDI file — drag it into your DAW to re-voice with any instrument or keep editing the part.
Audio (WAV)
Bounce the instrument's output to a stereo WAV for a quick printed take.
Clip snapshot
The last few seconds of output are always kept ready, so you can grab a happy accident the moment it happens.